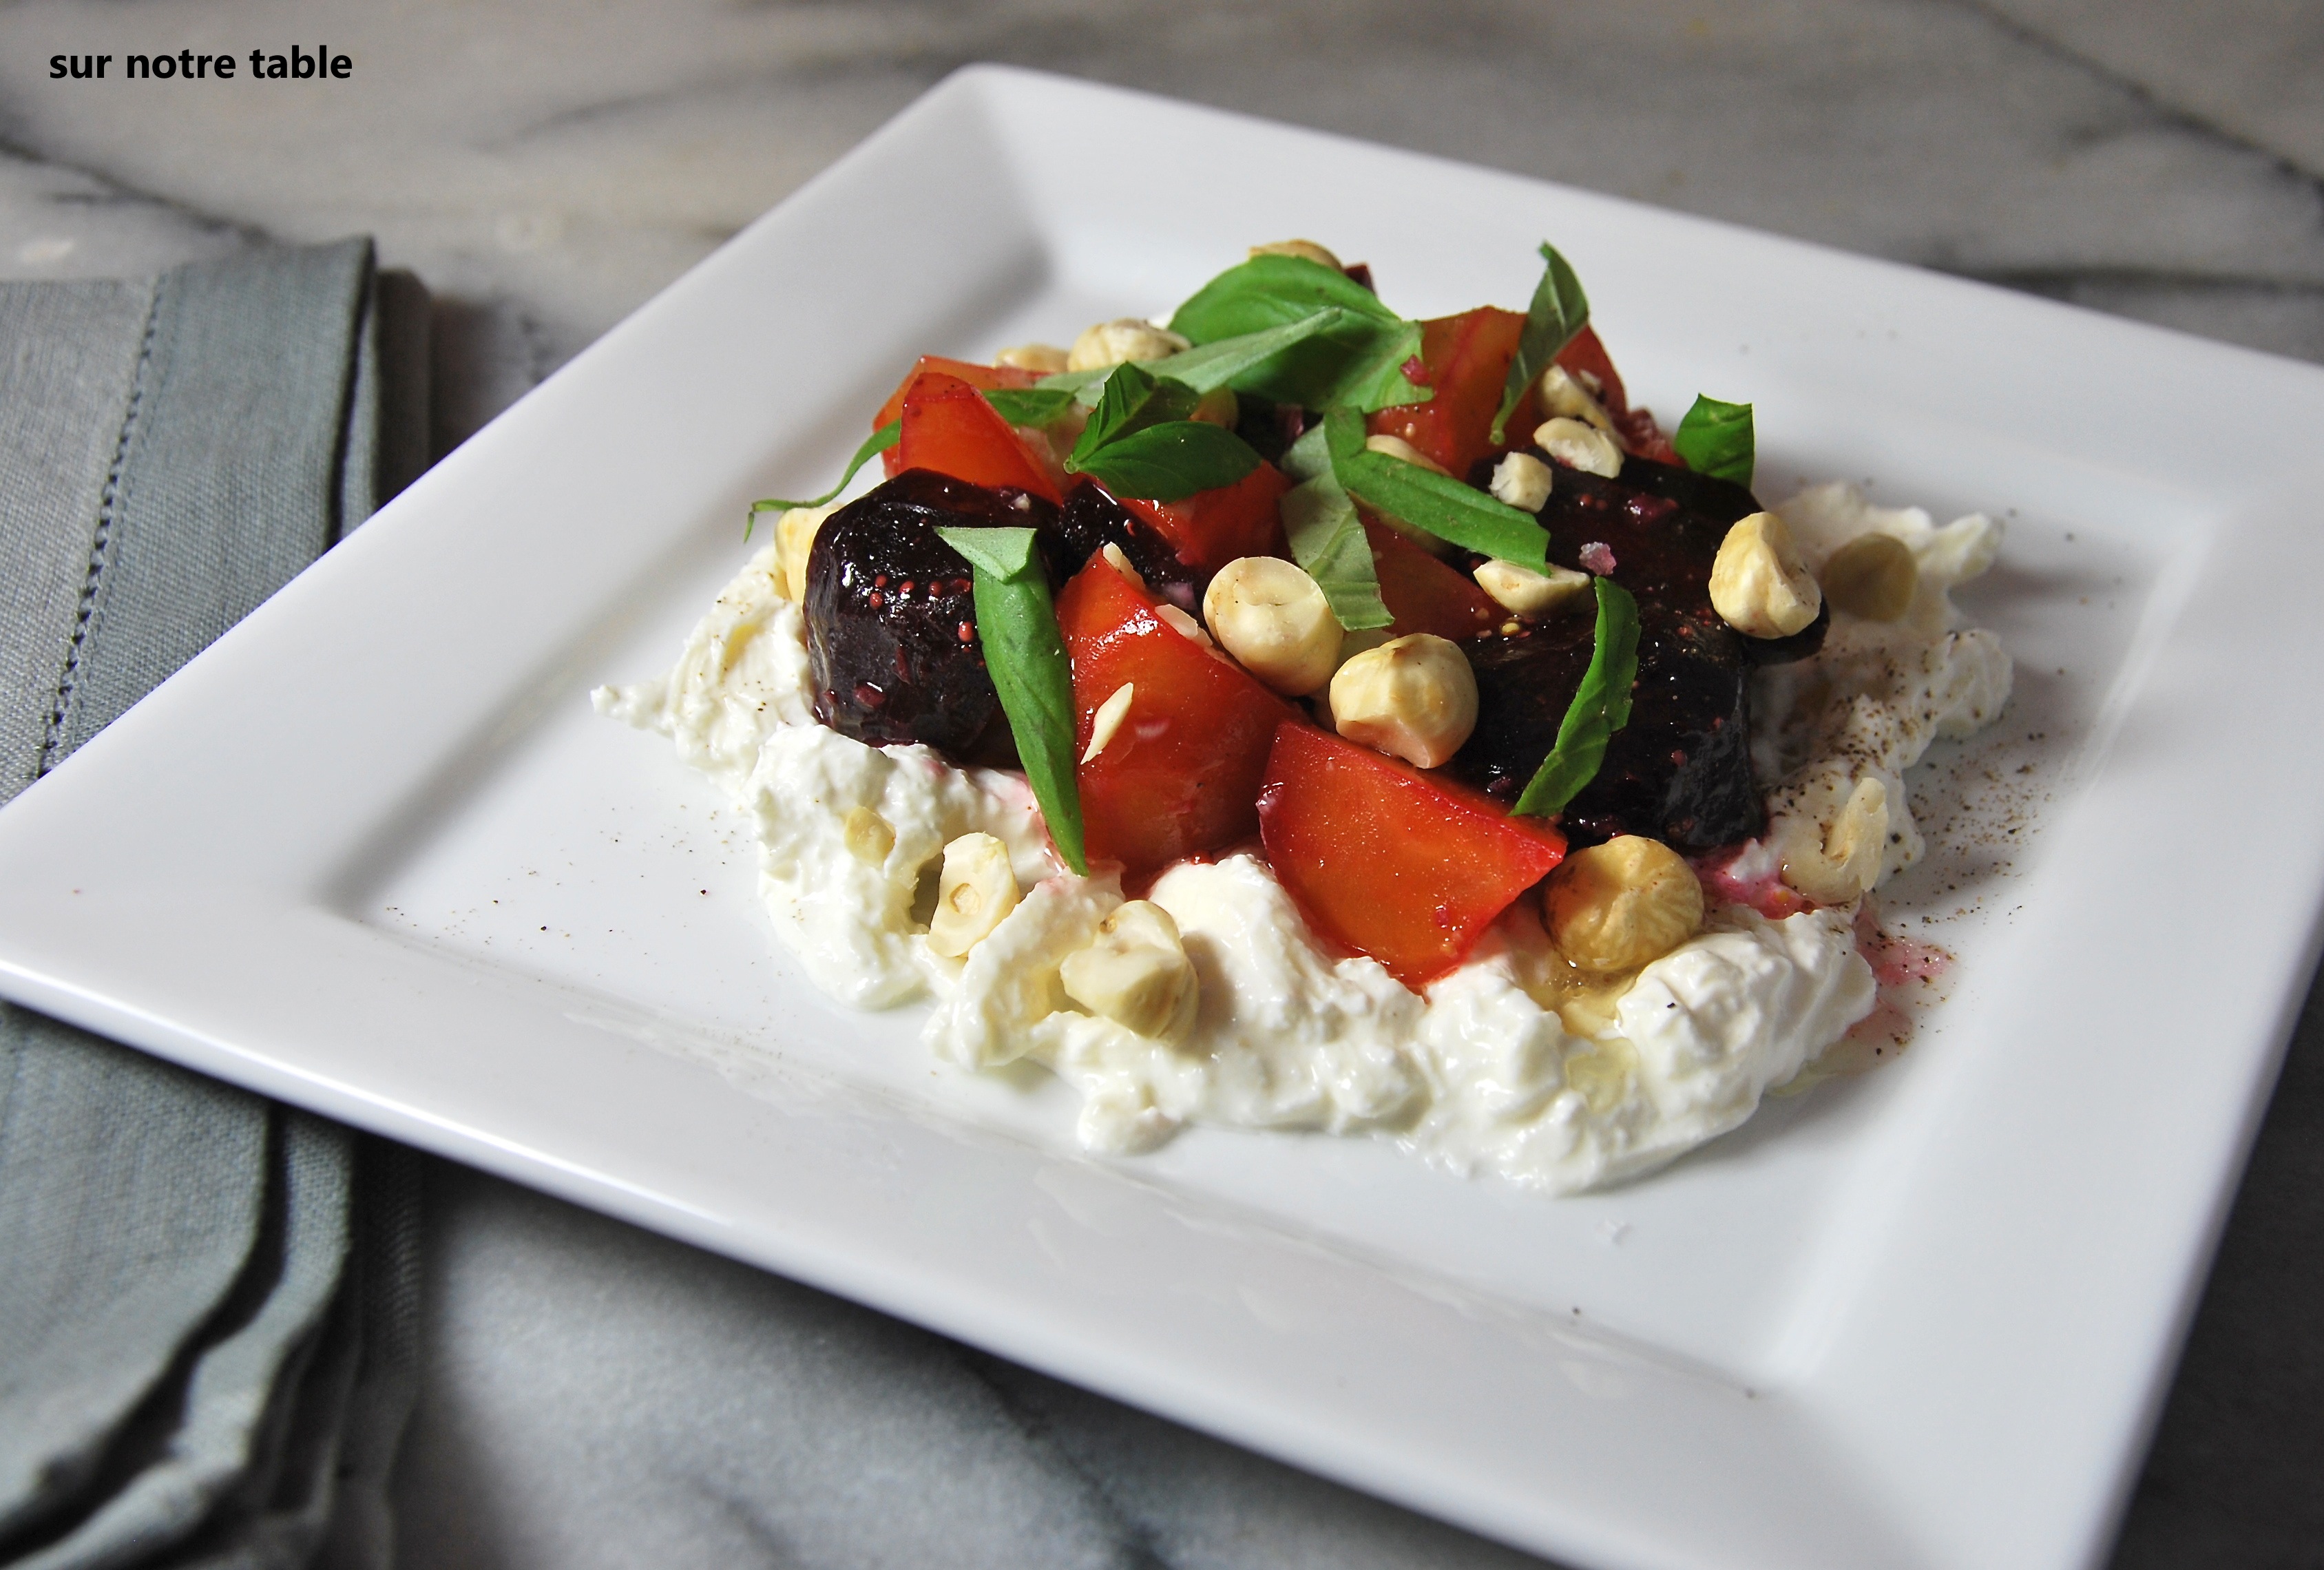
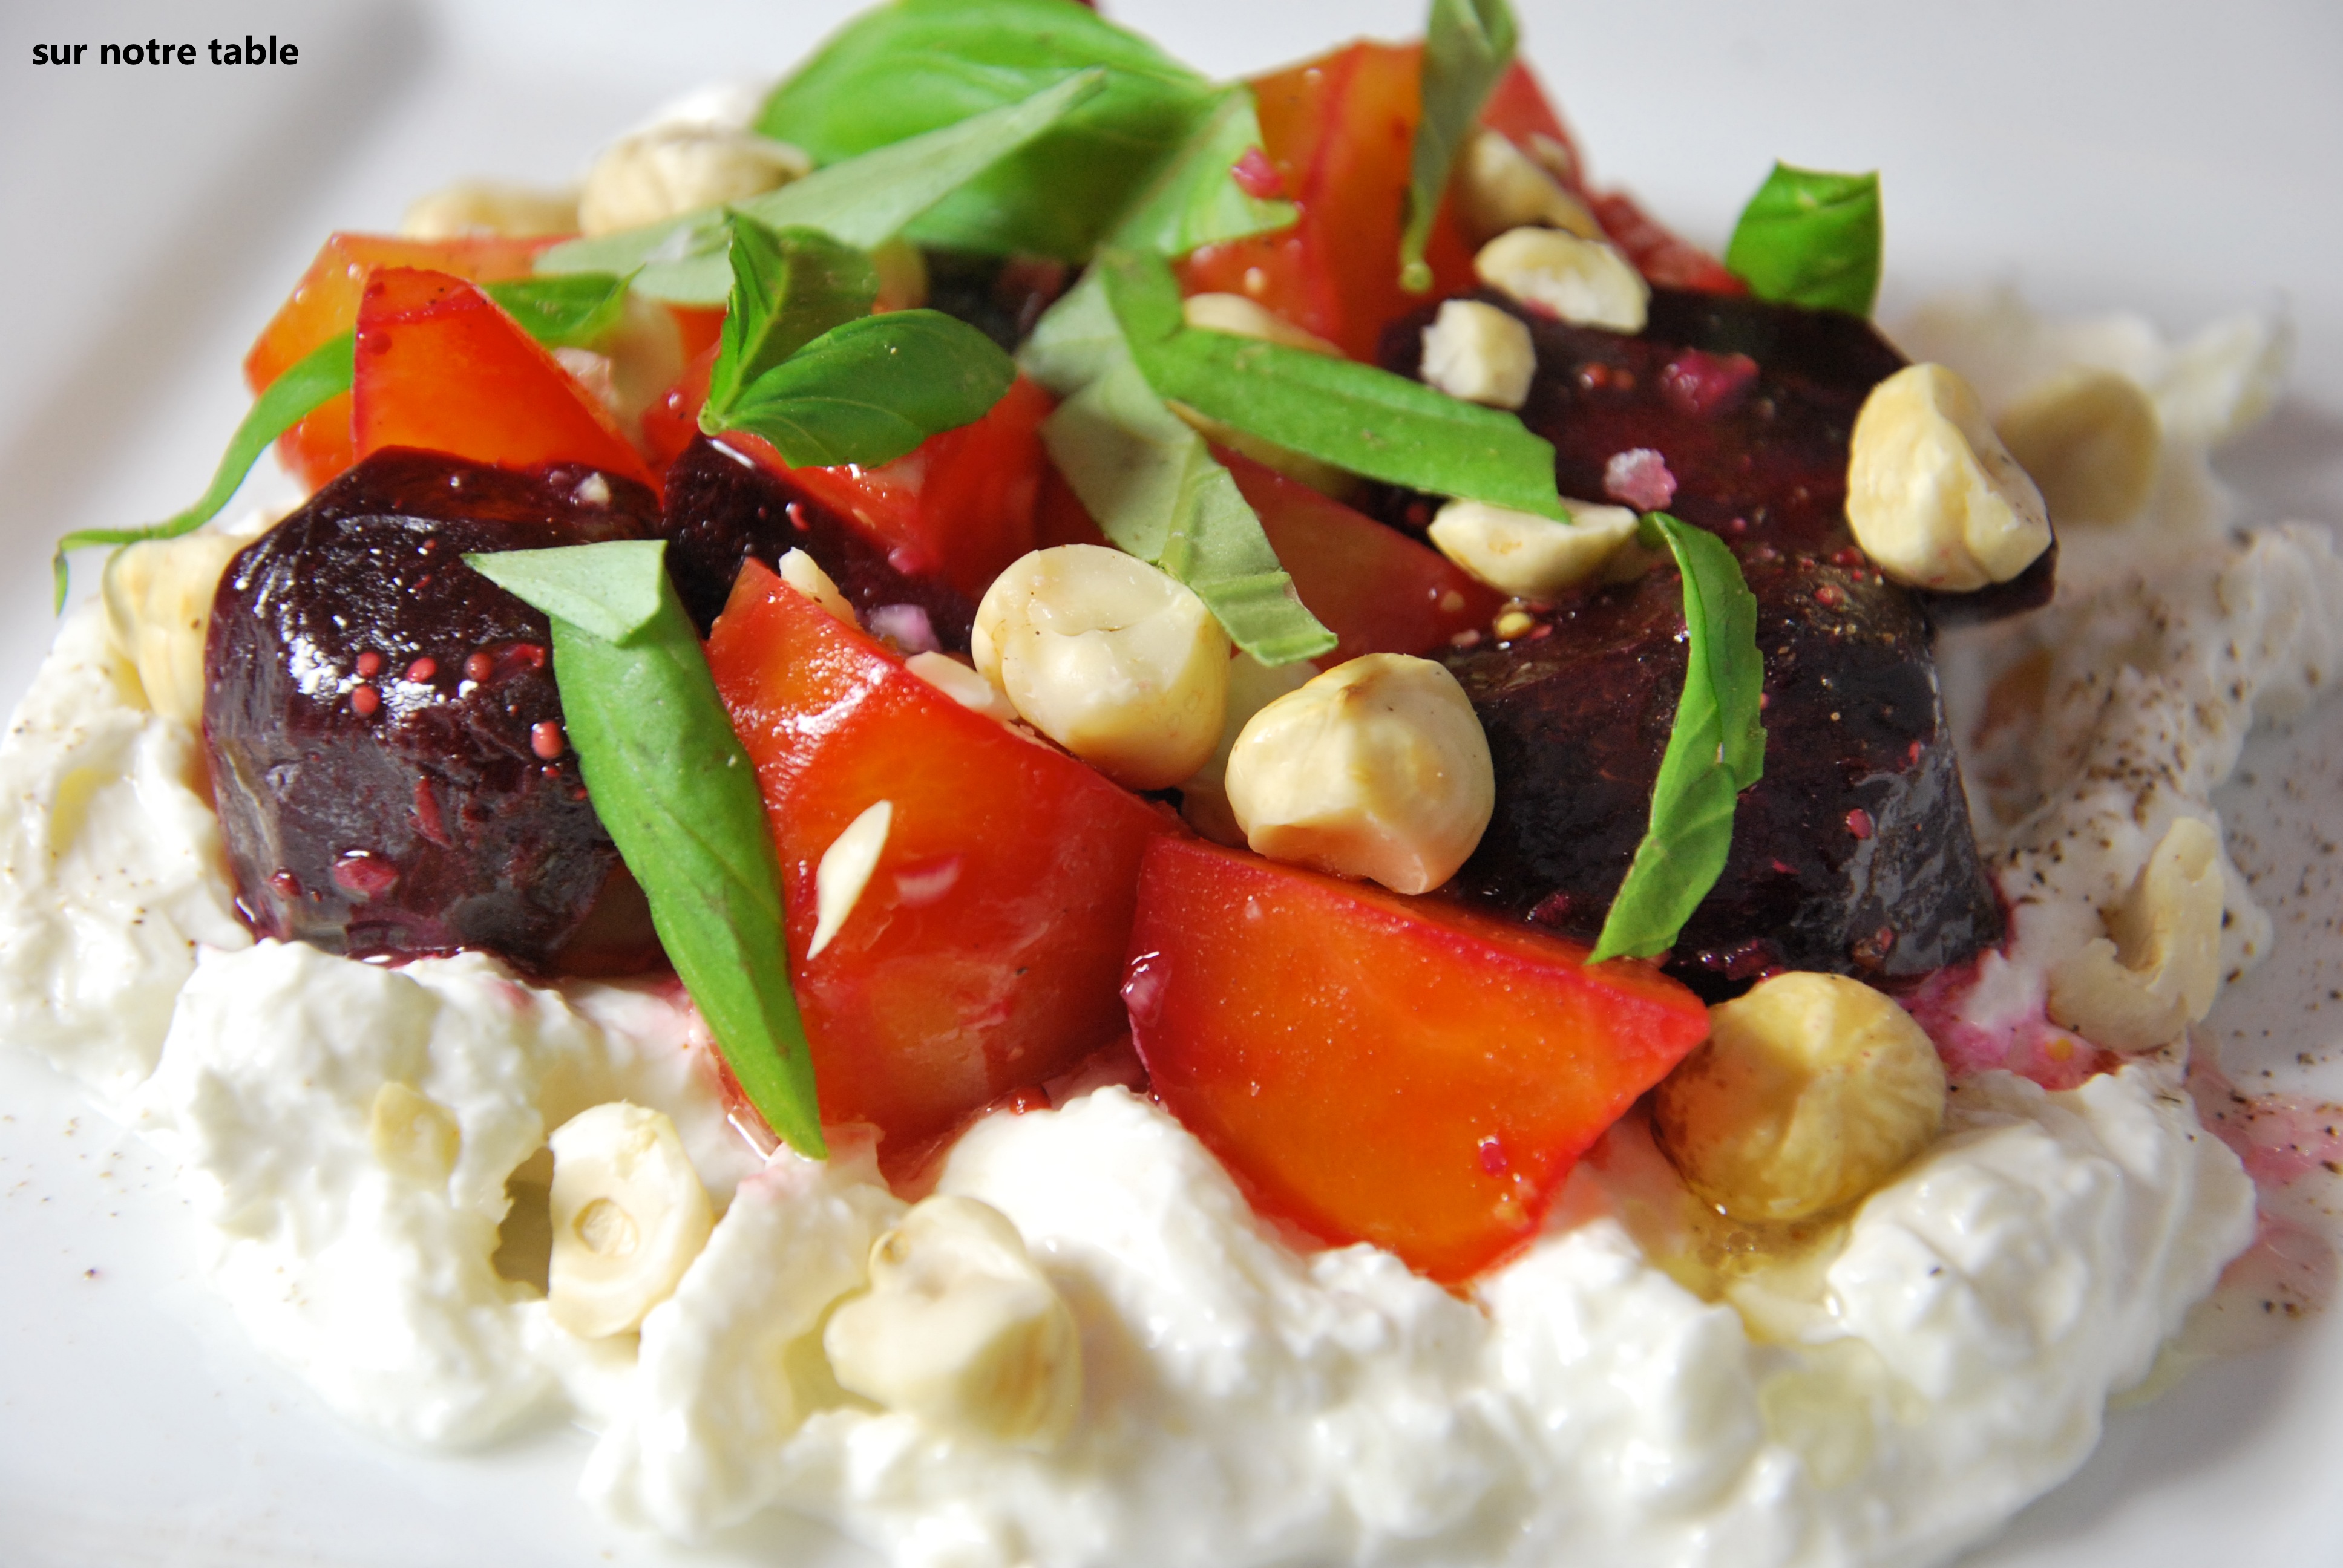
watermelon feta salad, a staple for the summer

watermelon feta salad

watermelon feta salad

For those super hot days, nothing beats a refreshing watermelon salad with feta. Interesting combination but unbeatable, as it is both savoury and refreshing.   It’s easy and quick to prepare and makes for a great salad to accompany a BBQ.

There are many different variations of this salad, as seen in restaurants and on the web, sometimes it’s served with mint instead of basil, and olives and onions are even added to the mix, but I like to keep it simple as I find the olives and onions can overpower the watermelon. However don’t scrimp on the ingredients, try to get the best feta you can find, not Canadian feta but Greek feta, and even better if you can get your hands on the goat feta, also use the best olive oil you have and choose the pinkest watermelon possible!

No need to prepare this in advance as it only takes 5 minutes to assemble!

Serves 2

ingredients:

  • watermelon, 1/2 inch slice then cubed
  • 1 inch thick slice of greek feta, cubed
  • bunch of thai basil or purple basil
  • extra virgin olive oil
  • juice of 1/2 lemon
  • ground fresh black pepper
watermelon feta salad

watermelon feta salad

  1. Cut one slice of the watermelon and cube it and assemble on a plate by keeping same shape as slice.
  2. Sprinkle cubed Greek feta overtop watermelon.
  3. Sprinkle basil leaves and then drizzle olive oil overtop.  Squeeze lemon juice from 1/2 lemon and grind fresh black pepper over salad.
  4. Voila, that’s it.  Simple, easy and refreshing!

Enjoy!

Go-to creamy buttermilk coleslaw for BBQ season

buttermilk coleslaw

buttermilk coleslaw

This buttermilk coleslaw is my go-to summer BBQ salad!  It is a great side to most meats that you will BBQ, such as beer-can chicken, baby back ribs, as shown above, or sausages.  It is especially well paired when you’re serving up something that is spicy as it helps cut the spice with it’s creamy and rich buttermilk dressing.  It is also perfect in a pulled pork sandwich too!

This is a great salad to prepare for a BBQ as it can be made in advance and refrigerated.  My husband even prefers it the next day so you can even prepare it a day in advance if need be.  It’s so easy and quick to put it together that you can also make it on a weeknight BBQ as you can whip this up in under 15 minutes!

Take note that even though the dressing tastes rich, it doesn’t necessarily have to be high in fat content.  Yes, the buttermilk is low in fat, but feel free to use light mayonnaise and low-fat sour cream, as I do, it will cut down on the fat and be just as rich and creamy tasting!

Serves 4

ingredients:

  • 1 small red onion (or ¼ of a large red onion) thinly sliced
  • 2 shallots, minced
  • 2 tablespoons white vinegar
  • Packaged coleslaw (pre-cut green and red cabbage and carrots)
  • If there are no carrots in the packaged coleslaw julienne 1 carrot

ingredients for dressing:

  • ¼ cup mayonnaise
  • ½ cup buttermilk
  • ¾ cup sour cream
  • 1 tablespoon flat-leaf (Italian) parsley, finely minced
  • 2 tablespoons chives, finely chopped
  • salt and fresh ground white pepper to taste
buttermilk coleslaw

buttermilk coleslaw

  1. In a large bowl combine red onion and shallots in white vinegar.
  2. Add packaged coleslaw to large bowl (and carrots if no carrots are included in the packaged coleslaw) and toss.
  3. In a medium bowl, stir together ingredients for dressing, mayonnaise, buttermilk, sour cream, parsley and chives.  Season dressing with salt and white pepper.
  4. Pour buttermilk dressing in coleslaw mix and toss until well coated and serve! That’s it!

fried stuffed zucchini flowers

zucchini blossoms

zucchini blossoms

We served this summer-time indulgence to friends this weekend and they were gobbled up in a blink of an eye!  Obviously frying them takes away from the delicate flavour so distinctive of these flowers, but as we all know frying is just like bacon, it just makes everything even tastier.

Sadly these beautiful golden blossoms do not stay fresh for too long after they are picked, and will wilt within a day.  If eaten the day of the purchase it will be easy for you to stuff them, but if you wait any longer the flower petals will wilt and it will be difficult to open them to stuff the flowers.  In this case you can just fry them without stuffing them, which is also very delicious.

However in this house, we prefer the fried stuffed version where mozzarella cheese oozes out of them!

The recipe below, which has been adapted from a William-Sonoma recipe, is based on the traditional Roman recipe, which recommends using mozzarella cheese to stuff the zucchini blossoms.  However since the typical mozzarella found at the grocery store can sometimes lack in taste, we chose to stuff them with mozzarella de bufala instead, which is a little more creamier.  The anchovies also add the characteristic saltiness to make it even more flavourful.

zucchini flowers

zucchini flowers

ingredients:

  • 1 cup all purpose flour
  • 1 teaspoon salt, plus more for taste
  • 2 eggs
  • ½ cup of cold sparkling mineral water
  • 1 tablespoon vegetable oil, plus oil for deep-frying
  • 4 ounce ball of fresh mozzarella de bufala
  • 5 anchovy fillets
  • 20 zucchini blossoms
fried stuffed zucchini flowers

fried stuffed zucchini flowers

  1. Before stuffing zucchini flowers you must remove the pistils or filaments which are found inside the flower   However it’s a little tricky to remove the pistils without damaging the flower petals and therefore I recommend that you do this as soon as you get home with the zucchini flowers before the petals begin to wilt.  If not the flower petals will stick together which will make it difficult to reach in the flower and pinch off the pistils.
  2. Once the pistils are removed you can then stuff the blossoms shortly before you are ready to fry them.
  3. To make the batter, mix the flour and the 1 teaspoon of salt in a small bowl.  Add the eggs, sparking water and 1 tablespoon of oil to the flour mix and whisk until well blended.
  4. Cut the mozzarella ball into sticks which are about 1 inch long and ½ wide.  Pat the anchovies dry with paper towels and cut each fillet into fours.
  5. You can fry the zucchini blossoms in a deep fat fryer if you have one or otherwise you can just as easily fry them in a heavy and high fry pan that is about 3 inches deep.  In either case heat the oil to 375oF.
  6. You will also need to heat oven to 175oF so you can keep the fried zucchini flowers warm as you fry the others.
  7. While the oil is heating, gently spread open the petals of each flower and insert a piece of the cheese and a piece of anchovy into each flower and press the petals closed.
  8. Once the flowers are stuffed, dip the flowers one at a time into the batter to coat the flower completely.  Lift out and let the excess drip back into the bowl.  As this can get quite messy it’s best to dip all the flowers and then fry them.  I usually just place a sheet of parchment paper on the counter and lay the battered blossoms on the paper before I put them in the deep fryer or the frying pan.
  9. Once the oil is heated through you can then slip the battered flowers into the hot oil and fry until golden brown on all sides for about 4 minutes.  In the deep fat fryer turn them halfway through so they can brown on all sides.  Afterwards use tongs or a slotted spoon to transfer them to a paper towel on top of a plate to drain.  Season with fleur de sel and then place in the oven while you fry the remainder of the flowers.
  10. Then serve immediately as is and enjoy!

fresh springtime four-herb pesto spaghettini

four-herb pesto spaghettini

four-herb pesto spaghettini

The beauty of spring is that we no longer have to buy expensive fresh herbs from the grocery store, which often go bad before we get to use them all up.  We are now able to pick our own fresh herbs either from a window box or a home garden.  There’s nothing like using fresh herbs and here’s a pesto recipe that will beautifully leverage the bright flavours of the fresh herbs in your garden.

This is an updated version of the pasta served with pesto.  The pesto is comprised of four herbs which you should hopefully have in your herb box or garden; parsley, tarragon, sage and basil.  The difference between the basil pesto and this four herb pesto is that these herbs are chopped and not taken through the blender so the flavours of each herb is much more prominent.   The four-herb pesto spaghettini can be served as is for a vegetarian option, but if you enjoy a little protein as I do, you can simply top the pasta with chopped strips of prosciutto as I have done here.

The pesto can be prepared a few hours in advance and then combined with cooked pasta when ready to serve.

Serves 2

four-herb pesto spaghettini

four-herb pesto spaghettini

ingredients

  • ½ cup lightly packed fresh flat-leaf parsley leaves
  • ½ cup lightly packed fresh basil leaves
  • 1 tablespoon lightly packed fresh tarragon leaves
  • 1 tablespoon lightly packed fresh sage leaves
  • ½ teaspoon fresh lemon juice
  • 1 small garlic clove, coarsely chopped
  • ¼ cup freshly grated Parmesan cheese
  • ¼ cup pine nuts, lightly toasted
  • ¼ cup extra-virgin olive oil
  • spaghettini for two
  • pinch of freshly ground pepper & kosher salt
  • 2 slices of prosciutto (optional)
four-herb pesto spaghettini

four-herb pesto spaghettini

  1. Boil lightly salted water in a large pot over medium-high heat for the spaghettini.
  2. Finely chop the parsley, basil, tarragon, and sage and place in a bowl.  Sprinkle the lemon juice on the herbs and coat the herbs with the lemon juice.
  3. Combine the garlic, Parmesan cheese, and pine nuts in the blender or food processor.  Then add the olive oil slowly as the machine is still running and process until mixture is creamy and fully blended.
  4. Pour this oil mixture into the bowl with the herbs and stir to combine.
  5. Add the spaghettini to the boiling water and cook according to package instructions.
  6. If you wish to top the pasta with prosciutto, while the pasta is cooking chop the prosciutto into ribbons and set aside.
  7. When the pasta is cooked, drain and transfer to a serving bowl and toss pasta with the pesto, a pinch or two of salt and a few grinds of pepper.
  8. Top with the prosciutto and serve.

refreshing chilled cucumber and dill soup

Image

cucumber and dill soup

cucumber and dill soup

A cold soup is the perfect appetizer for a summer BBQ and this one is particularly refreshing, as the crushed caraway seeds and the dill give it that special zing.  Since this is the beginning of the growing season, it’s a perfect time to use the locally grown garden cucumbers instead of the all-year-around English cucumbers which have little flavour in comparison to the garden cucumber.   If you can’t find the local garden cucumber you can of course use the English cucumbers.

This easy recipe is adapted from a Williams-Sonoma recipe.  The only special equipment you will need for this recipe is a blender to purée all of the ingredients.

This refreshing chilled soup can be prepared in advance up to 12 hours before you serve it, which makes for an easy appetizer to serve when entertaining a group of friends for a BBQ.

ingredients

  • 4 garden cucumbers peeled, halved lengthwise and seeded
  • 1 cup Greek yogurt (low-fat)
  • 1 tablespoon lemon juice, freshly squeezed
  • 3 green onions, both light green and darker green tops, chopped
  • 3 tablespoons fresh dill, chopped and a few sprigs for garnish
  • 1 small garlic clove, chopped
  • 1 teaspoon caraway seeds, crushed
  • 1 teaspoon kosher salt
  • ¼ teaspoon ground white pepper
  • 3/4 cup vegetable stock or broth
  • 2 tablespoons extra-virgin oil

Serves 6

cucumber and dill soup

cucumber and dill soup

  1. After peeling, halving lengthwise and taking it out the seeds of 3 cucumbers, chop the cucumber halves coarsely.
  2. Transfer the cucumber halves into a large bowl and combine with the yogurt, lemon juice, green onions, dill, garlic, caraway seeds, salt and white pepper.  Cover bowl with plastic wrap and set aside a room temperature for about an hour.
  3. In the meantime you can peel, half and seed the 4th cucumber and then dice this last remaining cucumber into small ½ inch cubes.  Set aside until ready to serve.
  4. Once the flavours of the cucumber and the other ingredients have combined you can pour into a blender and purée until smooth.  Then slowly add the vegetable stock and continue to purée until it is fully blended, for about 30 seconds.
  5. Transfer soup into a pitcher and cover with plastic wrap and chill in refrigerator for about 2 hours.  You can actually make this soup about 12 hours in advance as it can be stored in an airtight container in the refrigerator until your are ready to serve it.
  6. When ready to serve the soup, mix in the olive oil into the soup and serve in small bowls or as we did in verrines.  Then just add cubed cucumber to each bowl, top with a sprig of dill and serve immediately.

BB, no, not a new cream, it’s beets and burrata, an indulgent combination!

beets and burrata

beets and burrata

You can’t beat this combination, beets and burrata.  I must admit that I have only become a fan of beets, that is, roasted beets, just recently.  Pardon my ignorance, but the reason I never ventured into the beets territory is simply because for all these years I thought beets always came out of a jar in their vinegary form!  For some reason, I’ve never been a fan of food pickled in vinegar so I just avoided trying anything with beets.  And while I’m at it, why pickle anything?  Aren’t eggs just better fresh anyways and if you’re going to keep anything why not just put it in olive oil, instead of vinegar…

Anyhow enough about the pickling, let me tell you about one magical day in a restaurant in Montreal which changed my perception of beets.  A friend had mentioned that the best salad on the menu of this restaurant was the beet and goat cheese salad.   Well, this was the game changer for me, at that moment I discovered that beets come in wonderfully bright colours other than dark burgundy and that they are actually very flavourful especially when roasted.

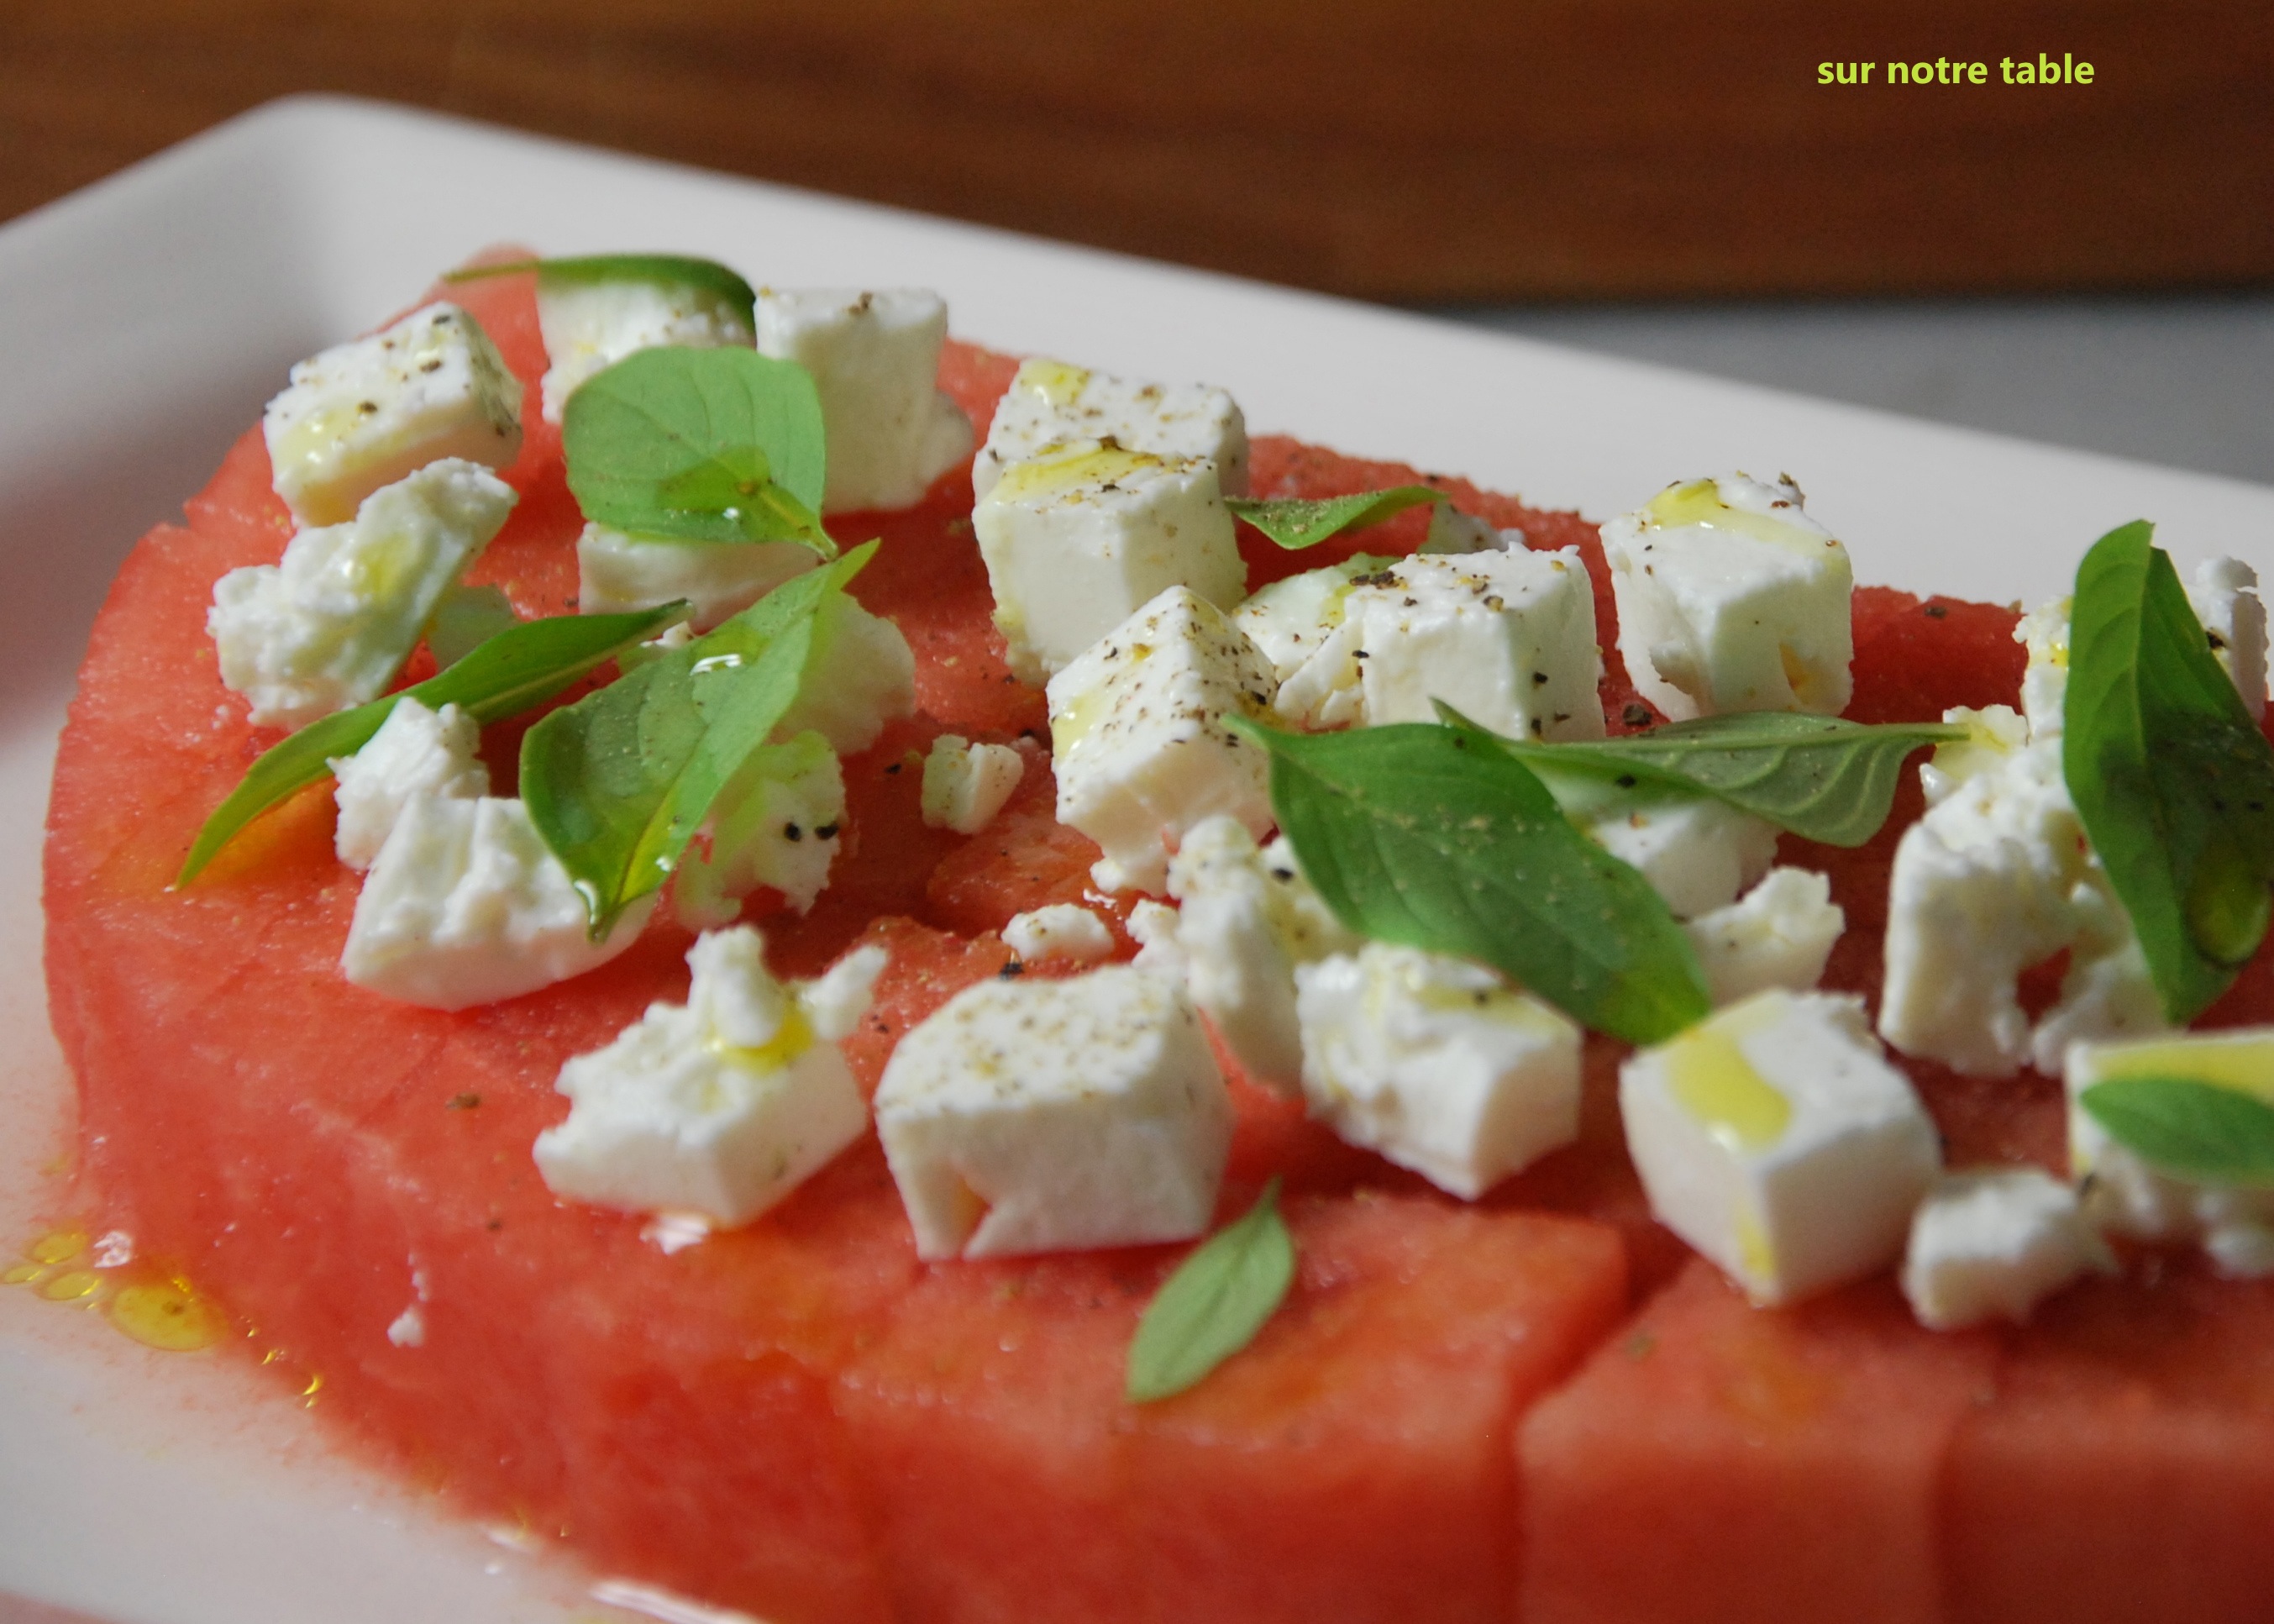
So, yes roasted beets are quite good served in a salad with goat cheese, as it is often prepared, however you can bring it to another level by serving it with burrata instead of goat cheese.

If you haven’t experienced burrata yet, let me introduce you to a whole new world of fresh italian cheese which is just heavenly creamy.   In my book, once you go burrata you can’t go back to mozzarella or even mozzarella di bufala.  It’s just a better version of mozzarella as the mozzarella is combined with cream in a pouch made of mozzarella.  It’s quite indulgent and can be served with fresh tomatoes just as is done with mozzarella di bufala or served with roasted beets as done here.

The beets and the vinaigrette for this recipe can both be prepared in advance, up to a day prior to you serving the salad, which makes for a great first course when hosting guests.  It is not only bright and colourful but it’s spectacular because of the addition of the oh-so decadent burrata.  The roasted hazelnuts are also a must in this salad as they add the necessary crunchy texture to the mix.

Serves 4

beets and burrata

beets and burrata

ingredients

vinaigrette

  • 2 tablespoons champagne vinegar
  • 1 tablespoon lemon juice
  • 2 teaspoons shallot, minced
  • 1 teaspoon whole grain mustard
  • 4 tablespoons grapeseed oil
  • Kosher salt and ground black pepper

salad

  • 8-10 medium sized beets, golden, candy-stripped or red beets, tops trimmed
  • 2 tablespoons extra-virgin olive oil
  • kosher salt and freshly ground black pepper
  • 2 200g packs of burrata or fresh mozzarella di bufala if you can’t find burrata
  • bunch of basil leaves, cut lengthwise into ribbons
  • ¼ cup toasted hazelnuts, peeled and coarsely chopped
  1. Preheat oven at 375oF
  2. To make vinaigrette combine vinegar, lemon juice and shallot in a small bowl and stir in mustard.  Gradually whisk in oil.  Season to taste with salt and pepper.  You can cover and chill vinaigrette while the beets are roasting.
  3. Toss beets in oil and season with salt and pepper.
  4. Transfer beets to a baking dish large enough to fit all beets.  I prefer to line the baking dish with aluminum foil as it prevents me from having to clean and scrub the baking dish as the beets will bleed in the baking dish.  Then cover baking dish with foil really tightly so steam cannot escape.  Cook for about 50 to 60 minutes, until a toothbpick can slide easily through the beets.
  5. Carefully uncover the baking dish as the steam is very hot.  Let beets cool for about 10 minutes, until you can handle them, then peel beets by using a paper towel to help rub off the peel.  This will also help in ensuring you don’t stain your hands.
  6. Quarter the beets.  In a medium bowl toss beets with ½ of quantity of vinaigrette.
  7. Spread burrata on a serving plate and season with salt and pepper.  Top burrata with beets and drizzle remaining vinaigrette over the beets and burrata.  Garnish with toasted hazelnuts and basil.

Voila, beets served with heavenly creamy burrata!